

Fast and Secure Contact Form (FS Contact From in short) has more features as compared to any other Contact Form plugins available for free on the WordPress plugin store. FS Contact Form is not only reliable, but also secure and it comes with inbuilt CAPTCHA that help you to protect your forms from spammers while in other hand MailChimp for WP help you to build a genuine E-mail list by integrating it with your WordPress powered website and the MailChimp account.
Unlike every plugin, themes and software out there on the Internet, the MailChimp for WP also lacks some of the features or you can say are intently not made available and one such feature is integration of FS Contact Form with MailChimp for the WordPress.
So, what’s the solution, Is that end of FS Contact Form? Should you find an alternative Form Plugin for your website? No, definitely not! The solution is right here on this page. In this article we have detailed on how you can associated i.e. link your MailChimp account to FS Contact and that’s without the use of MailChimp for WP plugin.
Things you will need
- MailChimp – account that you might be already having
- FS Contact Form – that again you must have installed
- Basic HTML knowledge – I am confident that you might be expert in that
Step 1- Getting ready with MailChimp account
The most important step in this tutorial is the MailChimp account. If you have not set up yet, you can create one for free from mailchimp.com or login from login.mailchimp.com if you have already created. Once you have logged-in into your MailChimp account, follow the below step by step instruction to create a “Form for Website”, that we are going to associate with the FS Contact form.
- Click on “Lists” option at the top of the page under the Navigation bar
- Click on your preferred “List” from the lists that you have created and under which you would like to add up the E-mail through FS Contact Form
- Click on “Signup Forms” link given with other options to manage the list
- Under the “Signup Forms” option select “Embedded forms” option.
- Now create and generate the HTML form embed code
- Secure the HTML Embed Code after generating it (you can save it as a text file on your PC)
Step 2 – Integrating the MailChimp form with FS Contact Form
Once you have got the MailChimp HTML Form Embed code you can continue with this step else follow the Step #1 to generate the Form Embed Code.
In this step we are going to integrate the MailChimp account with FS Contact Form via MailChimp Embed form for the website.
- Login into your WordPress dashboard
- Go to Plugins and just below “Fast Secure Contact Form” select “Settings“
- Select the form that you would like to integrate with MailChimp account
- Click on “Advance” tab and go to under the section “Silent Remote Sending Settings“
- Select the “Enabled : Post Method” from Silent Remote Sending option
To integrate MailChimp account with FS Contact Form you will need following details
- Silent Remote URL – (The URL where the details to be posted; you need to add the URL given in MailChimp Form Embed code which you have generated in Step #1)
- Silent send fields to ignore – (You need to add here the fields that you want to ignore while submitting to Silent Remote URL)
- Silent send fields to rename – (Very Important)
- Silent send key value pairs to add – (You need to add here the pair-key and the button name with its value to avoid failure of submission)
Modifying “Silent send fields to rename”
In the field you have to replace the FS Contact Form fields name with the MailChimp Form fields that you have generated in the #1 step. To replace you have to follow following syntax (an example)
 form_name=FNAME
form_email=EMAIL
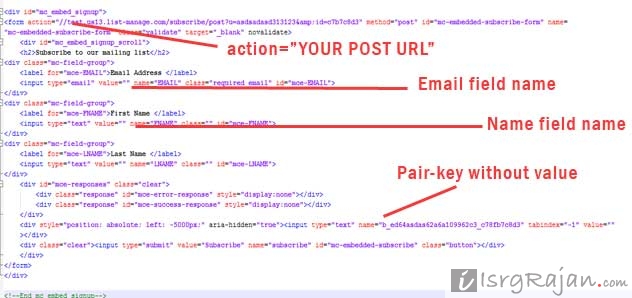
Sample of MailChimp Sign up Embedded Form
<div id="mc_embed_signup">
<form action="//UR-USERNAME.us13.list-manage.com/subscribe/post?u=AUTO-UID&id=UR-ID" method="post" id="mc-embedded-subscribe-form" name="mc-embedded-subscribe-form" class="validate" target="_blank" novalidate>
<div id="mc_embed_signup_scroll">
<h2>Subscribe to our mailing list</h2>
<div class="indicates-required"><span class="asterisk">*</span> indicates required</div>
<div class="mc-field-group">
<label for="mce-EMAIL">Email Address <span class="asterisk">*</span>
</label>
<input type="email" value="" name="EMAIL" class="required email" id="mce-EMAIL">
</div> <!-- // Here comes your E-mail while submitting -->
<div class="mc-field-group">
<label for="mce-FNAME">First Name </label>
<input type="text" value="" name="FNAME" class="" id="mce-FNAME">
</div> <!-- // Here comes your first name -->
<div class="mc-field-group">
<label for="mce-LNAME">Last Name </label>
<input type="text" value="" name="LNAME" class="" id="mce-LNAME">
</div> <!-- // Here comes your second or the last name -->
<div id="mce-responses" class="clear">
<div class="response" id="mce-error-response" style="display:none"></div>
<div class="response" id="mce-success-response" style="display:none"></div>
</div>
<!-- // Below is the field to protect the form from spammers, using pair-keys -->
<input type="text" name="b_ed643d1ab00d62a6a109962c3_c78fb7c8d3" tabindex="-1" value="">
<div class="clear"><input type="submit" value="Subscribe" name="subscribe" id="mc-embedded-subscribe" class="button"></div>
</div>
</form>
</div>
Still need more details or assistance in integrating ? Wel, raise your question on our forum
