
Do you feel as if making jewellery is a complicated process? Well, you could not be more wrong! After going through these easy projects, you will be able to create some by yourself. Who knows maybe you could invest in these and sell online to earn a generous income?

1. Essential Oil Diffusing Bracelet
You will need:
air dry clay, wooden skewer, jewellery making stretch cord, beads, essential oil and hot glue
Process:
- Roll the clay into a tube shape and pinch of some rolls. Roll it between your palms until it ends up like a ball. Create some pattern on it either adding more clay or scratching at the surface.
- Now, take the wooden skewer and start making holes in the beads. Set them to dry up while still attached to the skewer.
- Take your stretching cord and cut it into an appropriate length (which is usually twice the circumference of a wrist). Start inserting the stretching cord into the clay beads and beads through the holes.
- Now comes the hour to tie the knot. Cross the two ends of the stretching cord, wrapping the right end of the cord at least twice. Pull at the ends until tight enough to keep the beads pressed together. Repeat the process. Trim off any extra. Add a gloop of hot glue for extra security.
- Drop some essential oil onto the clay beads. Make sure you apply it on parts of beads that will not touch your skin. Or apply those oils which would not react with your skin.
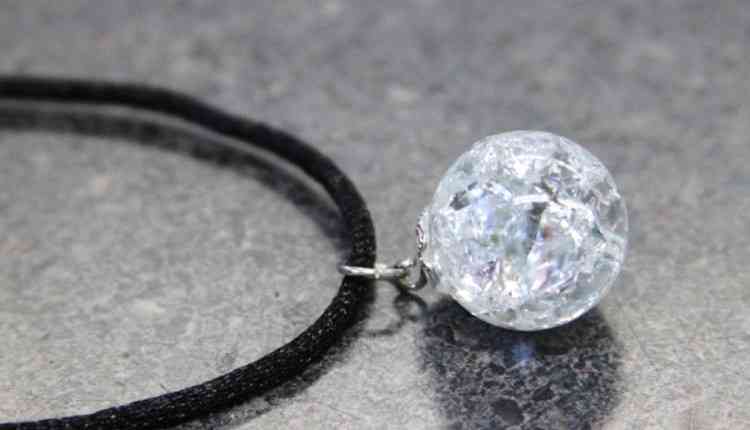
2. Cracked Marble Necklace
You will need:
Clear marbles, necklace cords, bead caps, eye pins, jump rings, strong flue, needle nosed jewellery pliers, baking sheet, bowl, tray, ice water and an oven.
Process:
- Start with heating the oven to 500 degrees. Spread our your clear marbles onto the tray lined with baking sheet. For twenty minutes, put it into the oven.
- Get a bowl filled with ice water. After you take out the marbles from the oven (be extra careful) dump these into the bowl.
- Now that they have cracked strain the water out and let them dry.
- Insert the eye pin into the bead cap. Trim off the other end of the pin while leaving enough to be able to create a loop. Create the loop with pliers. Apply strong glue for some extra security. Add the glue into the bead cap. Stick the bead cap onto the cracked marble. Now you have a pendant!
- After drying, add a jump ring into the loop. Through this attach it to a necklace cord.
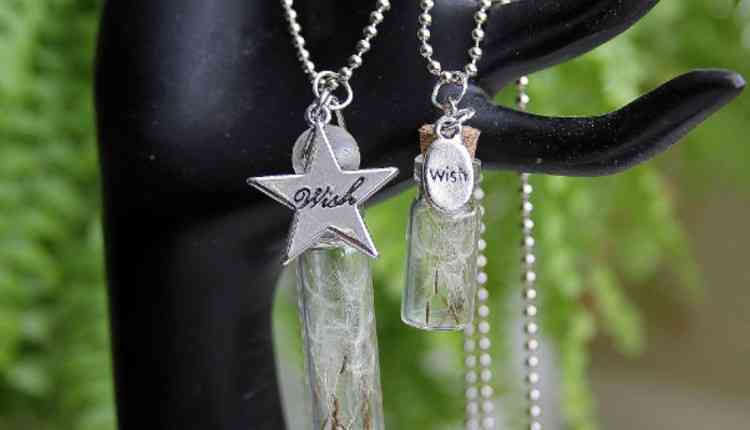
3. Dandelion Bottle Necklace
You will Need:
Ball link chain, ‘wish’ silver charm, bottle charm with a cork top or bottle charm with a rubber stopper, jump rings, dandelion, glue skewer and something to gather the dandelions in.
Process:
- Find a dandelion and collect it in a secure place.
- Remove the top of the bottle. And insert the dandelion fluffs. Distribute them evenly through the bottle with the help of a skewer. Close the bottle. Add some glue to the top and then insert it, for extra security.
- Use jump rings to attach your charm to the bottle stopper. Fix the bottle to the ball link chain. Done!
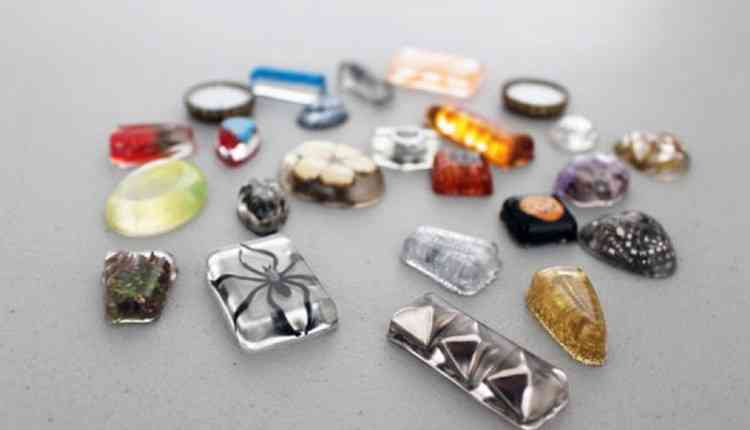
4. Resin Jewelry
You will Need:
Clear crafting epoxy, resin jewelry mold, wax paper, latex gloves, cups, squeeze bottles, blow dryer, ice cream sticks, shoe box, resin fillers like studs, dried flowers, feather, glitter, etc; jewelry item like ring pads, clasps, safety pins, etc; hot glue and measuring cups.
Process:
- Place the resin and hardener bottles in a bowl filled with hot water. Cover the workspace with wax paper.
- Use the resin mould to arrange the fillers.
- Mix the resin (1:1 ratio of resin and hardener) in a cup for two minutes and then, add it to the squeeze bottles.
- Pour a layer of resin into the mould, add your fillers, then pour another layer of resin over it. Add glitter on top.
- Using a blow dryer, get rid of the air bubbles.
- Allow it to harden overnight while being covered with a shoe box or any other bin. This is to prevent any dust, spores or anything else that is unwanted, from becoming a part of the jewellery. If it still has not hardened, pop it into the freezer for ten to fifteen minutes.
- Now using jewellery items, create your jewellery like a charm, pendant, necklace, bracelet, earrings, etc.

5. Crystal Topped Jewelry Box
You will need:
white pipe cleaners, string, scissors, borax, heat-safe glass jar, measuring spoon, food colouring, pencil, paintbrush, metallic gold enamel paint, spool or bottle cap paint thinner, strong glue, wooden box.
Process:
- Start by rolling the pipe cleaners into a coil. Weave in the ends to prevent any hole from forming in the centre.
Cut a string and thread it through one of the outer rings. Put aside. - Take a glass container and put in some tablespoon of borax.
- Boil water in a small pot. Add food colouring. Increase the amount of food colouring according to how deep you want the shade to be. Stir to mix better.
- Carefully, pour the water over the borax powder and mix until all of it has fully dissolved.
- Now take your pipe cleaner plus string and tie it to a pencil. Dunk it into the borax solution. Let it remain so for at least five hours. Cover with a dish towel.
- Remove it after five hours and dry it with a paper towel, gently. Cut off the attached string.
- Paint the edges of the crystal with metallic enamel paint and paintbrush. Clean the brush with a paint thinner.
- Rest the crystal on top of a spool, away from direct sunlight.
- Now paint the wooden box and glue the crystal to the lid.
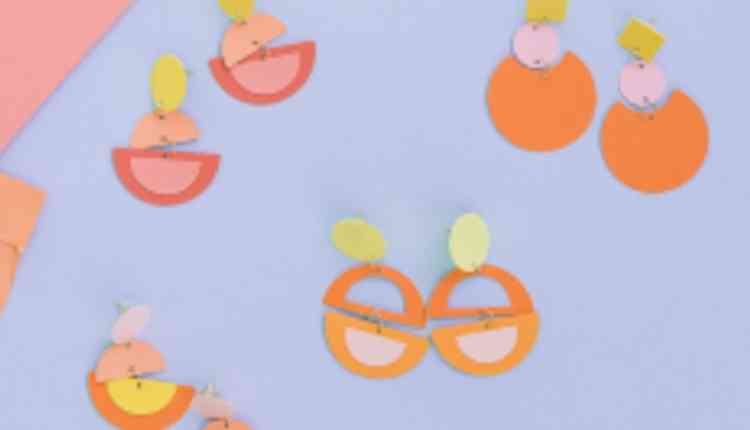
6. Paper Earrings
 You will need:
Cardstock, scissor, gold earring posts and backs, gold jump rings, hot glue, hole puncher.
Process:
- Begin by cutting out some geometric shapes like circle, triangle, square, rectangle, diamond, etc.
- If you wish, stick them together using glue.
- Plan out your earring pattern like how do you wish to stack them, layers, etc.
- Now, punch in a hole at the bottom and above using a hole puncher.
- Take a jump ring and connect it with the shapes.
- Once all are connected, use hot glue to stick an earring post on the back of the top shape and place it near the top edge of the shape.
- Make an identical earring for the other ear, too!
